
3.1.2 Command-line Options

|
|
3.1.1 Notation and Basic Assumptions |
POV-Ray 3.6 for UNIX documentation 3.1.2 Command-line Options |
3.2 Scene Description Language |
|
The reference section describes all command line switches and INI file keywords that are used to set the options of POV-Ray. It is supposed to be used as a reference for looking up things. It does not contain detailed explanations on how scenes are written or how POV-Ray is used. It just explains all features, their syntax, applications, limits, drawbacks, etc.
Options may be specified by switches or INI-style options. Almost all INI-style options have equivalent +/
- switches and most switches have equivalent INI-style option. The following sections give a detailed
description of each POV-Ray option. It includes both the INI-style settings and the +/ -
switches.
The notation and terminology used is described in the tables below.
Keyword=bool
|
Turn Keyword on if bool equals true, yes, on or 1
and Turn it off if it is any other value.
|
Keyword=true
|
Do this option if true, yes, on or 1 is specified.
|
Keyword=false
|
Do this option if false, no, off or 0 is specified.
|
Keyword=filename
|
Set Keyword to filename where filename is any valid file name.
Note: some options prohibit the use of any of the above |
| n |
Any integer such as in +W320
|
| n.n |
Any float such as in Clock=3.45
|
| 0.n | Any float < 1.0 even if it has no leading 0 |
| s | Any string of text |
| x or y | Any single character |
| path | Any directory name, drive optional, no final path separator ("\" or "/", depending on the operating system) |
Unless otherwise specifically noted, you may assume that either a plus or minus sign before a switch will produce the same results.
Internal animation loop, automatic output file name numbering and the ability to shell out to the operating system to external utilities which can assemble individual frames into an animation, greatly improved the animation capability. The internal animation loop is simple yet flexible. You may still use external programs or batch files to create animations without the internal loop.
Clock=n.n
|
Sets clock float identifier to n.n
|
+Kn.n
|
Same as Clock=n.n
|
The Clock=n.n option or the +Kn.n switch may be used to pass a single
float value to the program for basic animation. The value is stored in the float identifier clock. If an
object had a rotate <0,clock,0> attached then you could rotate the object by different amounts over
different frames by setting +K10.0,+K20.0... etc. on successive renderings. It is up to the
user to repeatedly invoke POV-Ray with a different Clock value and a different Output_File_Name
for each frame.
The internal animation loop relieves the user of the task of generating complicated sets of batch files to invoke
POV-Ray multiple times with different settings. While the multitude of options may look intimidating, the clever set
of default values means that you will probably only need to specify the Final_Frame=n or the +KFFn
option to specify the number of frames. All other values may remain at their defaults.
Any Final_Frame setting other than -1 will trigger POV-Ray's internal animation loop. For example
Final_Frame=10 or +KFF10 causes POV-Ray to render your scene 10 times. If you specified Output_File_Name=file.tga
then each frame would be output as file01.tga, file02.tga, file03.tga etc. The
number of zero-padded digits in the file name depends upon the final frame number. For example +KFF100
would generate file001.tga through file100.tga. The frame number may encroach upon the file
name. On MS-DOS with an eight character limit, myscene.pov would render to mysce001.tga
through mysce100.tga.
The default Initial_Frame=1 will probably never have to be changed. You would only change it if you
were assembling a long animation sequence in pieces. One scene might run from frame 1 to 50 and the next from 51 to
100. The Initial_Frame=n or +KFIn option is for this purpose.
Note: if you wish to render a subset of frames such as 30 through 40 out of a 1 to
100 animation, you should not change Initial_Frame or Final_Frame. Instead you should use
the subset commands described in section "Subsets of Animation Frames".
Unlike some animation packages, the action in POV-Ray animated scenes does not depend upon the integer frame
numbers. Rather you should design your scenes based upon the float identifier clock.
By default, the clock value is 0.0 for the initial frame and 1.0 for the final frame. All other frames are
interpolated between these values. For example if your object is supposed to rotate one full turn over the course of
the animation, you could specify rotate 360*clock*y. Then as clock runs from 0.0 to 1.0, the object
rotates about the y-axis from 0 to 360 degrees.
The major advantage of this system is that you can render a 10 frame animation or a 100 frame or 500 frame or 329 frame animation yet you still get one full 360 degree rotation. Test renders of a few frames work exactly like final renders of many frames.
In effect you define the motion over a continuous float valued parameter (the clock) and you take discrete samples at some fixed intervals (the frames). If you take a movie or video tape of a real scene it works the same way. An object's actual motion depends only on time. It does not depend on the frame rate of your camera.
Many users have already created scenes for POV-Ray 2 that expect clock values over a range other than the default
0.0 to 1.0. For this reason we provide the Initial_Clock=n.n or +KIn.n and Final_Clock=n.n
or +KFn.n options. For example to run the clock from 25.0 to 75.0 you would specify Initial_Clock=25.0
and Final_Clock=75.0. Then the clock would be set to 25.0 for the initial frame and 75.0 for the final
frame. In-between frames would have clock values interpolated from 25.0 through 75.0 proportionally.
Users who are accustomed to using frame numbers rather than clock values could specify Initial_Clock=1.0
and Final_Clock=10.0 and Frame_Final=10 for a 10 frame animation.
For new scenes, we recommend you do not change the Initial_Clock or Final_Clock from
their default 0.0 to 1.0 values. If you want the clock to vary over a different range than the default 0.0 to 1.0, we
recommend you handle this inside your scene file as follows...
  #declare Start    = 25.0;
  #declare End      = 75.0;
  #declare My_Clock = Start+(End-Start)*clock;
Then use My_Clock in the scene description. This keeps the critical values 25.0 and 75.0 in your .pov
file.
Note: more details concerning the inner workings of the animation loop are in the section on shell-out operating system commands in section "Shell-out to Operating System".
When creating a long animation, it may be handy to render only a portion of the animation to see what it looks
like. Suppose you have 100 frames but only want to render frames 30 through 40. If you set Initial_Frame=30
and Final_Frame=40 then the clock would vary from 0.0 to 1.0 from frames 30 through 40 rather than 0.30
through 0.40 as it should. Therefore you should leave Initial_Frame=1 and Final_Frame=100
and use Subset_Start_Frame=30 and Subset_End_Frame=40 to selectively render part of the
scene. POV-Ray will then properly compute the clock values.
Usually you will specify the subset using the actual integer frame numbers however an alternate form of the subset
commands takes a float value in the range 0.0 <=n.nnn <=1.0 which is interpreted as a fraction of the
whole animation. For example, Subset_Start_Frame=0.333 and Subset_End_Frame=0.667 would
render the middle 1/3rd of a sequence regardless of the number of frames.
Cyclic_Animation=bool
|
Turn cyclic animation on/off |
+KC
|
Turn cyclic animation on |
-KC
|
Turn cyclic animation off |
Many computer animation sequences are designed to be run in a continuous loop. Suppose you have an object that
rotates exactly 360 degrees over the course of your animation and you did rotate 360*clock*y to do so.
Both the first and last frames would be identical. Upon playback there would be a brief one frame jerkiness. To
eliminate this problem you need to adjust the clock so that the last frame does not match the first. For example a ten
frame cyclic animation should not use clock 0.0 to 1.0. It should run from 0.0 to 0.9 in 0.1 increments. However if
you change to 20 frames it should run from 0.0 to 0.95 in 0.05 increments. This complicates things because you would
have to change the final clock value every time you changed Final_Frame. Setting Cyclic_Animation=on
or using +KC will cause POV-Ray to automatically adjust the final clock value for cyclic animation
regardless of how many total frames. The default value for this setting is off.
Field_Render=bool
|
Turn field rendering on/off |
Odd_Field=bool
|
Set odd field flag |
+UF
|
Turn field rendering on |
-UF
|
Turn field rendering off |
+UO
|
Set odd field flag on |
-UO
|
Set odd field flag off |
Field rendering is sometimes used for animations when the animation is being output for television. TVs only display alternate scan lines on each vertical refresh. When each frame is being displayed the fields are interlaced to give the impression of a higher resolution image. The even scan lines make up the even field, and are drawn first (i.e. scan lines 0, 2, 4, etc.), followed by the odd field, made up of the odd numbered scan lines are drawn afterwards. If objects in an animation are moving quickly, their position can change noticeably from one field to the next. As a result, it may be desirable in these cases to have POV-Ray render alternate fields at the actual field rate (which is twice the frame rate), rather than rendering full frames at the normal frame rate. This would save a great deal of time compared to rendering the entire animation at twice the frame rate, and then only using half of each frame.
By default, field rendering is not used. Setting Field_Render=on or using +UF will
cause alternate frames in an animation to be only the even or odd fields of an animation. By default, the first frame
is the even field, followed by the odd field. You can have POV-Ray render the odd field first by specifying
Odd_Field=on, or by using the +UO switch.
Height=n
|
Sets screen height to n pixels |
Width=n
|
Sets screen width to n pixels |
+Hn
|
Same as Height=n
|
+Wn
|
Same as Width=n
|
These switches set the height and width of the image in pixels. This specifies the image size for file output. The preview display, if on, will generally attempt to pick a video mode to accommodate this size but the display settings do not in any way affect the resulting file output.
When doing test rendering it is often convenient to define a small, rectangular sub-section of the whole screen so
you can quickly check out one area of the image. The Start_Row, End_Row, Start_Column
and End_Column options allow you to define the subset area to be rendered. The default values are the
full size of the image from (1,1) which is the upper left to (w,h) on the lower right where w and h are the Width=n
and Height=n values you have set.
Note: if the number specified is greater than 1 then it is interpreted as an absolute row or column number in pixels. If it is a decimal value between 0.0 and 1.0 then it is interpreted as a percent of the total width or height of the image.
For example: Start_Row=0.75 and Start_Column=0.75 starts on a row 75% down from the top
at a column 75% from the left. Thus it renders only the lower-right 25% of the image regardless of the specified width
and height.
The +SR, +ER, +SC and +EC switches work in the same way as
the corresponding INI-style settings for both absolute settings or percentages. Early versions of POV-Ray allowed only
start and end rows to be specified with +Sn and +En so they are still
supported in addition to +SR and +ER.
When rendering a subset of *columns* (+sc/+ec) POV-Ray generates a full width image and fills the not
rendered columns with black pixels. This should not be a problem for any image reading program no matter what file
format is used.
when rendering a subset of *rows* (+sr/+er) POV-Ray writes the full height into the image file header
and only writed those lines into the image that are rendered. This can cause problems with image reading programs that
are not checking the file while reading and just read over the end.
if POV-Ray wrote the actual height of the partial image into the image header there would be no way to continue the trace in a later run.
On some operating systems once you start a rendering you must let it finish. The Test_Abort=on option
or +X switch causes POV-Ray to test the keyboard for keypress. If you have pressed a key, it will
generate a controlled user abort. Files will be flushed and closed but only data through the last full row of pixels
is saved. POV-Ray exits with an error code 2 (normally POV-Ray returns 0 for a successful run or 1 for a fatal error).
When this option is on, the keyboard is polled on every line while parsing the scene file and on every pixel while
rendering. Because polling the keyboard can slow down a rendering, the Test_Abort_Count=n
option or +Xn switch causes the test to be performed only every n pixels rendered or
scene lines parsed.
If you abort a render while it is in progress or if you used the End_Row
option to end the render prematurely, you can use Continue_Trace=on or +C option to continue
the render later at the point where you left off. This option reads in the previously generated output file, displays
the partial image rendered so far, then proceeds with the ray-tracing. This option cannot be used if file output is
disabled with Output_to_file=off or -F.
The Continue_Trace option may not work if the Start_Row option has been set to anything
but the top of the file, depending on the output format being used. Also POV-Ray cannot continue the file once it has
been opened and saved again by any program
POV-Ray tries to figure out where to resume an interrupted trace by reading any previously generated data in the
specified output file. All file formats contain the image size, so this will override any image size settings
specified. Some file formats (namely TGA and PNG) also store information about where the file started (i. e. +SCn
and +SRn options), alpha output +UA, and bit-depth +FNn,
which will override these settings. It is up to the user to make sure that all other options are set the same as the
original render.
The Create_Ini option or +GI switch provides an easy way to create an INI file with all
of the rendering options, so you can re-run files with the same options, or ensure you have all the same options when
resuming. This option creates an INI file with every option set at the value used for that rendering. This includes
default values which you have not specified. For example if you run POV-Ray with...
POVRAY +Isimple.pov MYOPTS +GIrerun.ini MOREOPTS
POV-Ray will create a file called rerun.ini with all of the options used to generate this scene. The
file is not written until all options have been processed. This means that in the above example, the file will include
options from both myopts.ini and moreopts.ini despite the fact that the +GI
switch is specified between them. You may now re-run the scene with...
POVRAY RERUN
or resume an interrupted trace with
POVRAY RERUN +C
If you add other switches with the rerun.ini reference, they will be included in future re-runs
because the file is re-written every time you use it.
The Create_Ini option is also useful for documenting how a scene was rendered. If you render
waycool.pov with Create_Ini=on then it will create a file waycool.ini that you could
distribute along with your scene file so other users can exactly re-create your image.
The Display=on or +D switch will turn on the graphics display of the image while it is
being rendered. Even on some non-graphics systems, POV-Ray may display an 80 by 24 character "ASCII-Art"
version of your image. Where available, the display may be full, 24-bit true color. Setting Display=off
or using the -D switch will turn off the graphics display which is the default.
On the Windows platform, the default is Display=on. Turning display off does not, of course, turn off
the actual video display. Instead, POV-Ray will not open the output window that it normally shows a render in.
The Video_Mode=x option sets the display mode or hardware type chosen where x is a
single digit or letter that is machine dependent. Generally Video_Mode=0 means the default or an
auto-detected setting should be used. When using switches, this character immediately follows the switch. For example
the +D0 switch will turn on the graphics display in the default mode.
The Palette=y option selects the palette to be used. Typically the single character
parameter y is a digit which selects one of several fixed palettes or a letter such G for gray
scale, H for 15-bit or 16-bit high color or T for 24-bit true color. When using switches,
this character is the 2nd character after the switch. For example the +D0T switch will turn on the
graphics display in the default mode with a true color palette. The Display_Gamma=n.n setting
is not available as a command-line switch.
The Display_Gamma setting overcomes the problem of images (whether ray-traced or not) having
different brightness when being displayed on different monitors, different video cards, and under different operating
systems.
Note: the Display_Gamma is a setting based on your computer's display
hardware, and should be set correctly once and not changed.
The Display_Gamma INI setting works in conjunction with the new assumed_gamma global
setting to ensure that POV scenes and the images they create look the same on all systems. See section "Assumed_Gamma"
which describes the assumed_gamma global setting and describes gamma more thoroughly.
While the Display_Gamma can be different for each system, there are a few general rules that can be
used for setting Display_Gamma if you do not know it exactly. If the Display_Gamma keyword
does not appear in the INI file, POV-Ray assumes that the display gamma is 2.2. This is because most PC monitors have
a gamma value in the range 1.6 to 2.6 (newer models seem to have a lower gamma value). Mac has the ability to do gamma
correction inside the system software (based on a user setting in the gamma control panel). If the gamma control panel
is turned off, or is not available, the default Macintosh system gamma is 1.8. Many newer PC graphics cards can do
hardware gamma correction and should use the current Display_Gamma setting, usually 1.0.
The following gamma test image can be used to help you set your Display_Gamma accurately.
Before viewing the gamma image darken the room and set the monitor brightness and contrast to maximum. While viewing a black screen, lower the brightness gradually until the "background" is no longer noticeable (ie when it just fades from view). This may be difficult on monitors that use overscanning, unless you change the viewable area settings.
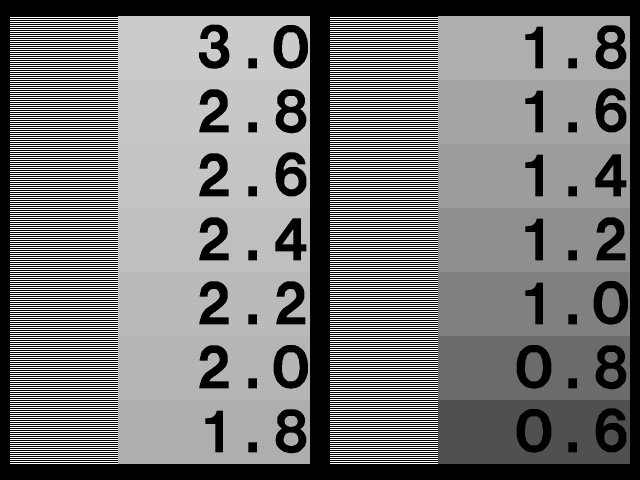
Now, lower the contrast until the alternating white and black bars on the left edge of each column are equal in width. This is trying to get a 50% gray by using half white and half black. If this is not possible, choose a contrast setting which is about in the middle. While viewing the image from a distance, or with squinted eyes, one of the numbered "swatches" will best match the gray value approximated by the white and black bars. The number in this "swatch" is your display's actual gamma value.
Normal display gamma values are in the range 2.0 to 2.6. If your monitor is usually used in a dim environment, we often use a gamma value that is 15% - 25% lower than the actual display gamma to give the images more contrast. Some systems, such as Macs and SGIs, already do gamma correction, so they may have display gammas of 1.0 or 1.8.
For scene files that do not contain an assumed_gamma global setting the INI file option Display_Gamma
will not have any affect on the preview output of POV-Ray or for most output file formats. However, the Display_Gamma
value is used when creating PNG format output files, and also when rendering the POV-Ray example files (because they
have an assumed_gamma), so it should still be correctly set for your system to ensure proper results.
On some systems, when the image is complete, the graphics display is cleared and POV-Ray switches back into text
mode to print the final statistics and to exit. Normally when the graphics display is on, you want to look at the
image awhile before continuing. Using Pause_When_Done=on or +P causes POV-Ray to pause in
graphics mode until you press a key to continue. The default is not to pause (-P).
When the graphics display is not used, it is often desirable to monitor progress of the rendering. Using
Verbose=on or +V turns on verbose reporting of your rendering progress. This reports the number of
the line currently being rendered, the elapsed time for the current frame and other information. On some systems, this
textual information can conflict with the graphics display. You may need to turn this off when the display is on. The
default setting is off (-V).
The option Draw_Vistas=on or +UD was originally a debugging help for POV-Ray's vista
buffer feature but it was such fun we decided to keep it. Vista buffering is a spatial sub-division method that
projects the 2-D extents of bounding boxes onto the viewing window. POV-Ray tests the 2-D x, y pixel location against
these rectangular areas to determine quickly which objects, if any, the viewing ray will hit. This option shows you
the 2-D rectangles used. The default setting is off (-UD) because the drawing of the rectangles can take
considerable time on complex scenes and it serves no critical purpose. See section "Automatic
Bounding Control" for more details.
Preview_Start_Size=n
|
Set mosaic preview start size to n |
+SPn
|
Same as Preview_Start_Size=n |
Preview_End_Size=n
|
Set mosaic preview end size to n |
+EPn
|
Same as Preview_End_Size=n |
Typically, while you are developing a scene, you will do many low resolution test renders to see if objects are placed properly. Often this low resolution version does not give you sufficient detail and you have to render the scene again at a higher resolution. A feature called "mosaic preview" solves this problem by automatically rendering your image in several passes.
The early passes paint a rough overview of the entire image using large blocks of pixels that look like mosaic tiles. The image is then refined using higher resolutions on subsequent passes. This display method very quickly displays the entire image at a low resolution, letting you look for any major problems with the scene. As it refines the image, you can concentrate on more details, like shadows and textures. You do not have to wait for a full resolution render to find problems, since you can interrupt the rendering early and fix the scene, or if things look good, you can let it continue and render the scene at high quality and resolution.
To use this feature you should first select a Width and Height value that is the
highest resolution you will need. Mosaic preview is enabled by specifying how big the mosaic blocks will be on the
first pass using Preview_Start_Size=n or +SPn. The value n should be a
number greater than zero that is a power of two (1, 2, 4, 8, 16, 32, etc.) If it is not a power of two, the nearest
power of two less than n is substituted. This sets the size of the squares, measured in pixels. A value of 16 will
draw every 16th pixel as a 16*16 pixel square on the first pass. Subsequent passes will use half the previous value
(such as 8*8, 4*4 and so on.)
The process continues until it reaches 1*1 pixels or until it reaches the size you set with Preview_End_Size=n
or +EPn. Again the value n should be a number greater than zero that is a power of two and less
than or equal to Preview_Start_Size. If it is not a power of two, the nearest power of two less than n
is substituted. The default ending value is 1. If you set Preview_End_Size to a value greater than 1 the
mosaic passes will end before reaching 1*1, but POV-Ray will always finish with a 1*1. For example, if you want a
single 8*8 mosaic pass before rendering the final image, set Preview_Start_Size=8 and
Preview_End_Size=8.
No file output is performed until the final 1*1 pass is reached. Although the preliminary passes render only as many pixels as needed, the 1*1 pass re-renders every pixel so that anti-aliasing and file output streams work properly. This makes the scene take up to 25% longer than the regular 1*1 pass to render, so it is suggested that mosaic preview not be used for final rendering. Also, the lack of file output until the final pass means that renderings which are interrupted before the 1*1 pass can not be resumed without starting over from the beginning.
Output_to_File=bool
|
Sets file output on/off |
+F
|
Sets file output on (use default type) |
-F
|
Sets file output off |
By default, POV-Ray writes an image file to disk. When you are developing a scene and doing test renders, the
graphic preview may be sufficient. To save time and disk activity you may turn file output off with
Output_to_File=off or -F.
The default type of image file depends on which platform you are using. MS-DOS and most others default to 24-bit
uncompressed Targa. Windows defaults to 'sys', which is 24-bit BMP. See your platform-specific documentation to see
what your default file type is. You may select one of several different file types using Output_File_Type=x
or +Fx where x is one of the following...
Note: the obsolete +FD dump format and +FR raw format have
been dropped because they were rarely used and no longer necessary. PPM, PNG, and system specific formats have been
added. PPM format images are uncompressed, and have a simple text header, which makes it a widely portable image
format. PNG is an image format designed not only to replace GIF, but to improve on its shortcomings. PNG offers the
highest compression available without loss for high quality applications, such as ray-tracing. The system specific
format depends on the platform used and is covered in the appropriate system specific documentation.
Most of these formats output 24 bits per pixel with 8 bits for each of red, green and blue data. PNG and PPM allow
you to optionally specify the output bit depth from 5 to 16 bits for each of the red, green, and blue colors, giving
from 15 to 48 bits of color information per pixel. The default output depth for all formats is 8 bits/color (16
million possible colors), but this may be changed for PNG and PPM format files by setting Bits_Per_Color=n
or by specifying +FNn or +FPn, where n is the desired bit depth.
Specifying a smaller color depth like 5 bits/color (32768 colors) may be enough for people with 8- or 16-bit (256 or 65536 color) displays, and will improve compression of the PNG file. Higher bit depths like 10 or 12 may be useful for video or publishing applications, and 16 bits/color is good for grayscale height field output (See section "Height Field" for details on height fields).
Targa format also allows 8 bits of alpha transparency data to be output, while PNG format allows 5 to 16 bits of
alpha transparency data, depending on the color bit depth as specified above. You may turn this option on with
Output_Alpha=on or +UA. The default is off or -UA.
The alpha channel stores a transparency value for each pixel, just like there is also stored a value for red green and blue light for each pixel. In POV-Ray, when the alpha channel is turned on, all areas of the image where the background is partly or fully visible will be partly or fully transparent. Refractions of the background will also be transparent, but not reflections. Also anti-aliasing is taken into account
The philosophy of the alpha channel feature in POV-Ray is that the background color should not be present in the color of the image when the alpha channel is used. Instead, the amount of visible background is kept in the alpha and *only* in the alpha channel. That ensures that images look correct when viewed with the alpha channel.
See section "Using the Alpha Channel" for further details on using transparency in imagemaps in your scene.
In addition to support for variable bit-depths, alpha channel, and grayscale formats, PNG files also store the
Display_Gamma value so the image displays properly on all systems (see section "Display
Hardware Settings"). The hf_gray_16 global setting, as described in section "HF_Gray_16"
will also affect the type of data written to the output file.
Output_File_Name=file
|
Sets output file to file |
+Ofile
|
Same as Output_File_Name=file
|
The default output filename is created from the scene name and need not be specified. The scene name is the input
name with all drive, path, and extension information stripped. For example if the input file name is
c:\povray3\mystuff\myfile.pov the scene name is myfile. The proper extension is appended to the
scene name based on the file type. For example myfile.tga or myfile.png might be used.
You may override the default output name using Output_File_Name=file or +Ofile.
For example:
 Input_File_Name=myinput.pov
 Output_File_Name=myoutput.tga
If an output file name of "-" is specified (a single minus sign), then the image will be written to standard output, usually the screen. The output can then be piped into another program or to a GUI if desired.
If the file specified is actually a path or directory or folder name and not a file name, then the default output name is used but it is written to the specified directory. For example:
 Input_File_Name=myscene.pov
 Output_File_Name=c:\povray3\myimages\
This will create c:\povray3\myimages\myscene.tga as the output file.
The output-file buffer options Buffer_Output and Buffer_Size are removed per POV-Ray 3.6
Note: the options are still accepted, but ignored, in order to be backward compatible with old INI files.
The CPU utilization histogram is a way of finding out where POV-Ray is spending its rendering time, as well as an interesting way of generating heightfields. The histogram splits up the screen into a rectangular grid of blocks. As POV-Ray renders the image, it calculates the amount of time it spends rendering each pixel and then adds this time to the total rendering time for each grid block. When the rendering is complete, the histogram is a file which represents how much time was spent computing the pixels in each grid block.
Not all versions of POV-Ray allow the creation of histograms. The histogram output is dependent on the file type and the system that POV-Ray is being run on.
Histogram_Type=y
|
Set histogram type to y (Turn off if type is 'X')
|
+HTy
|
Same as Histogram_Type=y
|
The histogram output file type is nearly the same as that used for the image output file types in "Output File Type". The available histogram file types are as follows.
Note: +HTC does not generate a compressed Targa-24 format output file
but rather a text file with a comma-separated list of the time spent in each grid block, in left-to-right and top-to
bottom order. The units of time output to the CSV file are system dependent. See the system specific documentation for
further details on the time units in CSV files.
The Targa and PPM format files are in the POV heightfield format (see "Height Field"), so the histogram information is stored in both the red and green parts of the image, which makes it unsuitable for viewing. When used as a height field, lower values indicate less time spent calculating the pixels in that block, while higher indicate more time spent in that block.
PNG format images are stored as grayscale images and are useful for both viewing the histogram data as well as for use as a heightfield. In PNG files, the darker (lower) areas indicate less time spent in that grid block, while the brighter (higher) areas indicate more time spent in that grid block.
Histogram_Name=file
|
Set histogram name to file |
+HNfile
|
Same as Histogram_Name=file
|
The histogram file name is the name of the file in which to write the histogram data. If the file name is not
specified it will default to histogram.ext, where ext is based on the file type specified
previously.
Note: that if the histogram name is specified the file name extension should match the file type.
Histogram_Grid_Size= nn.mm
|
Set histogram grid to nn by mm |
+HSnn.mm
|
Same as Histogram_Grid_Size=nn.mm
|
The histogram grid size gives the number of times the image is split up in both the horizontal and vertical directions. For example
povray +Isample +W640 +H480 +HTN +HS160.120 +HNhistogram.png
will split the image into 160*120 grid blocks, each of size 4*4 pixels, and output a PNG file, suitable for viewing or for use as a heightfield. Smaller numbers for the grid size mean more pixels are put into the same grid block. With CSV output, the number of values output is the same as the number of grid blocks specified. For the other formats the image size is identical to the rendered image rather than the specified grid size, to allow easy comparison between the histogram and the rendered image. If the histogram grid size is not specified, it will default to the same size as the image, so there will be one grid block per pixel.
Note: on systems that do task-switching or multi-tasking the histogram may not exactly represent the amount of time POV-Ray spent in a given grid block since the histogram is based on real time rather than CPU time. As a result, time may be spent for operating system overhead or on other tasks running at the same time. This will cause the histogram to have speckling, noise or large spikes. This can be reduced by decreasing the grid size so that more pixels are averaged into a given grid block.
POV-Ray reads in your scene file and processes it to create an internal model of your scene. The process is called parsing.
As your file is parsed other files may be read along the way. This section covers options concerning what to parse,
where to find it and what version specific assumptions it should make while parsing it.
Declare=IDENTIFIER=FLOAT
|
Declares an identifier with a float value |
You can now declare a constant in an INI file, and that constant will be available to the scene. Since INI file statements may also be laced on the command-line, you can therefore also declare on the command-line (though there is no switch for it).
Declare=MyValue=24
This would be the same as a #declare MyValue=24; in a scene file. The value on the right-hand side
must be a constant float value.
A possible use could be switching off radiosity or photons from commandline:
  --in INI-file / on command-line

  Declare=RAD=0

  --in scenefile

  global_settings {
     #if (RAD)
        radiosity {
           ...
        }
     #end
  }
Input_File_Name=file
|
Sets input file name to file |
+Ifile
|
Same as Input_File_Name=file
|
Note: there may be no space between +I and file.
You will probably always set this option but if you do not the default input filename is object.pov.
If you do not have an extension then .pov is assumed. On case-sensitive operating systems both .pov
and .POV are tried. A full path specification may be used (on MS-DOS systems
+Ic:\povray3\mystuff\myfile.pov is allowed for example). In addition to specifying the input file name this
also establishes the scene name.
The scene name is the input name with drive, path and extension stripped. In the above example the scene name is myfile.
This name is used to create a default output file name and it is referenced other places.
Note: as per version 3.5 you can now specify a POV file on the command-line without the use of the +i switch (i.e. it works the same way as specifying an INI file without a switch), the POV file then should be the last on the commandline.
If you use "-" as the input file name the input will be read from standard input. Thus you can pipe a scene created by a program to POV-Ray and render it without having a scene file.
Under MS-DOS you can try this feature by typing.
type ANYSCENE.POV | povray +I-
Include_Header=file
|
Sets primary include file name to file |
+HIfile
|
Same as Include_Header=file
|
This option allows you to include a file as the first include file of a scene file. You can for example use this option to always include a specific set of default include files used by all your scenes.
Library_Path=path
|
Add path to list of library paths |
+Lpath
|
Same as Library_Path=path
|
POV-Ray looks for files in the current directory. If it does not find a file it needs it looks in various other library directories which you specify. POV-Ray does not search your operating system path. It only searches the current directory and directories which you specify with this option. For example the standard include files are usually kept in one special directory. You tell POV-Ray to look there with...
Library_Path=c:\povray3\include
You must not specify any final path separators ("\" or "/") at the end.
Multiple uses of this option switch do not override previous settings. Up to twenty unique paths may be specified. If you specify the exact same path twice it is only counted once. The current directory will be searched first followed by the indicated library directories in the order in which you specified them.
Version=n.n
|
Set initial language compatibility to version n.n |
+MVn.n
|
Same as Version=n.n
|
As POV-Ray has evolved from version 1.0 through to today we have made every effort to maintain some amount of
backwards compatibility with earlier versions. Some old or obsolete features can be handled directly without any
special consideration by the user. Some old or obsolete features can no longer be handled at all. However some
old features can still be used if you warn POV-Ray that this is an older scene. In the POV-Ray scene language you can
use the #version directive to switch version compatibility to different settings. See section "The
#version Directive" for more details about the language version directive. Additionally you may use the Version=n.n
option or the +MVn.n switch to establish the initial setting. For example one feature
introduced in 2.0 that was incompatible with any 1.0 scene files is the parsing of float expressions. Setting
Version=1.0 or using +MV1.0 turns off expression parsing as well as many warning messages so that
nearly all 1.0 files will still work. Naturally the default setting for this option is the current version number.
Note: some obsolete or re-designed features are totally unavailable in the current version of POV-Ray REGARDLES OF THE VERSION SETTING. Details on these features are noted throughout this documentation.
Note: no + or - switches are available for these options.
They cannot be used from the command line. They may only be used from INI files.
POV-Ray offers you the opportunity to shell-out to the operating system at several key points to execute another program or batch file. Usually this is used to manage files created by the internal animation loop however the shell commands are available for any scene. The string s is a single line of text which is passed to the operating system to execute a program. For example
Post_Scene_Command=tga2gif -d -m myfile
would use the utility tga2gif with the -D and -M parameters to convert myfile.tga
to myfile.gif after the scene had finished rendering.
Note: individual platforms may provide means of preventing shell-outs from occurring. For example, the Windows version provides a menu command to turn shell-outs off (which is the default setting for that platform). The reason for this (along with file I/O restrictions) is to attempt to prevent untrusted INI files from doing harm to your system.
It could get cumbersome to change the Post_Scene_Command every time you changed scene names. POV-Ray
can substitute various values into a command string for you. For example:
Post_Scene_Command=tga2gif -d -m %s
POV-Ray will substitute the %s with the scene name in the command. The scene name is the Input_File_Name
or +I setting with any drive, directory and extension removed. For example:
Input_File_Name=c:\povray3\scenes\waycool.pov
is stripped down to the scene name waycool which results in...
Post_Scene_Command=tga2gif -d -m waycool
In an animation it may be necessary to have the exact output file name with the frame number included. The string %o
will substitute the output file name. Suppose you want to save your output files in a zip archive using the utility
program pkzip. You could do...
Post_Frame_Command=pkzip -m %s %o
After rendering frame 12 of myscene.pov POV-Ray would shell to the operating system with
pkzip -m myscene mysce012.tga
The -M switch in pkzip moves mysce012.tga to myscene.zip and
removes it from the directory. Note that %o includes frame numbers only when in an animation loop. During
the Pre_Scene_Command and Post_Scene_Command there is no frame number so the original,
unnumbered Output_File_Name is used. Any User_Abort_Command or Fatal_Error_Command
not inside the loop will similarly give an unnumbered %o substitution.
Here is the complete list of substitutions available for a command string.
%o
|
Output file name with extension and embedded frame number if any |
%s
|
Scene name derived by stripping path and ext from input name |
%n
|
Frame number of this frame |
%k
|
Clock value of this frame |
%h
|
Height of image in pixels |
%w
|
Width of image in pixels |
%%
|
A single % sign. |
Here is the sequence of events in an animation loop. Non-animated scenes work the exact same way except there is no loop.
If the user interrupts processing the User_Abort_Command, if any, is executed. User aborts can only
occur during the parsing and rendering parts of step (4b) above. If a fatal error occurs that POV-Ray notices the Fatal_Error_Command,
if any, is executed. Sometimes an unforeseen bug or memory error could cause a total crash of the program in which
case there is no chance to shell out. Fatal errors can occur just about anywhere including during the processing of
switches or INI files. If a fatal error occurs before POV-Ray has read the Fatal_Error_Command string
then obviously no shell can occur.
Note: the entire scene is re-parsed for every frame. Future versions of POV-Ray may allow you to hold over parts of a scene from one frame to the next but for now it starts from scratch every time.
Note: that the Pre_Frame_Command occurs before the scene is parsed. You
might use this to call some custom scene generation utility before each frame. This utility could rewrite your
.pov or .inc files if needed. Perhaps you will want to generate new .gif or .tga
files for image maps or height fields on each frame.
Note: that no + or - switches are available for these
options. They cannot be used from the command line. They may only be used from INI files.
Most operating systems allow application programs to return an error code if something goes wrong. When POV-Ray executes a shell command it can make use of this error code returned from the shell process and take some appropriate action if the code is zero or non-zero. POV-Ray itself returns such codes. It returns 0 for success, 1 for fatal error and 2 for user abort.
The actions are designated by a single letter in the different ..._Return=s options. The possible
actions are:
I
|
ignore the code |
S
|
skip one step |
A
|
all steps skipped |
Q
|
quit POV-Ray immediately |
U
|
generate a user abort in POV-Ray |
F
|
generate a fatal error in POV-Ray |
For example if your Pre_Frame_Command calls a program which generates your height field data and that
utility fails then it will return a non-zero code. We would probably want POV-Ray to abort as well. The option Pre_Frame_Return=F
will cause POV-Ray to do a fatal abort if the Pre_Frame_Command returns a non-zero code.
Sometimes a non-zero code from the external process is a good thing. Suppose you want to test if a frame has
already been rendered. You could use the S action to skip this frame if the file is already rendered.
Most utilities report an error if the file is not found. For example the command...
pkzip -V myscene mysce012.tga
tells pkzip you want to view the catalog of myscene.zip for the file mysce012.tga. If the
file is not in the archive pkzip returns a non-zero code.
However we want to skip if the file is found. Therefore we need to reverse the action so it skips on zero and does
not skip on non-zero. To reverse the zero vs. non-zero triggering of an action precede it with a "-"
sign (note a "!" will also work since it is used in many programming languages as a negate
operator).
Pre_Frame_Return=S will skip if the code shows error (non-zero) and will proceed normally on no error
(zero). Pre_Frame_Return=-S will skip if there is no error (zero) and will proceed normally if there is
an error (non-zero).
The default for all shells is I which means that the return action is ignored no matter what. POV-Ray
simply proceeds with whatever it was doing before the shell command. The other actions depend upon the context. You
may want to refer back to the animation loop sequence chart in the previous section "Shell
Command Sequencing". The action for each shell is as follows.
On return from any User_Abort_Command if there is an action triggered...
| ...and you have specified... | ...then POV-Ray will.. |
F
|
Then turn this user abort into a fatal error. Do the Fatal_Error_Command, if any. Exit POV-Ray
with error code 1.
|
S, A, Q, or U
|
Then proceed with the user abort. Exit POV-Ray with error code 2. |
On return from any Fatal_Error_Command then POV-Ray will proceed with the fatal error no matter what.
It will exit POV-Ray with error code 1.
On return from any Pre_Scene_Command, Pre_Frame_Command, Post_Frame_Command
or Post_Scene_Commands if there is an action triggered...
| ...and you have specified... | ...then POV-Ray will... |
F
|
...turn this user abort into a fatal error. Do the Fatal_Error_Command, if any. Exit POV-Ray with
error code 1.
|
U
|
...generate a user abort. Do the User_Abort_Command, if any. Exit POV-Ray with an error code 2.
|
Q
|
..quit POV-Ray immediately. Acts as though POV-Ray never really ran. Do no further shells, (not even a Post_Scene_Command)
and exit POV-Ray with an error code 0.
|
On return from a Pre_Scene_Command if there is an action triggered...
| ...and you have specified... | ...then POV-Ray will... |
S
|
...skip rendering all frames. Acts as though the scene completed all frames normally. Do not do any Pre_Frame_Command
or Post_Frame_Commands. Do the Post_Scene_Command, if any. Exit POV-Ray with error code
0. On the earlier chart this means skip step #4.
|
A
|
...skip all scene activity. Works exactly like Q quit. On the earlier chart this means skip to step
#6. Acts as though POV-Ray never really ran. Do no further shells, (not even a Post_Scene_Command) and
exit POV-Ray with an error code 0.
|
On return from a Pre_Frame_Command if there is an action triggered...
| ...and you have specified... | ...then POV-Ray will... |
S
|
...skip only this frame. Acts as though this frame never existed. Do not do the Post_Frame_Command.
Proceed with the next frame. On the earlier chart this means skip steps (4b) and (4c) but loop back as needed in
(4d).
|
A
|
...skip rendering this frame and all remaining frames. Acts as though the scene completed all frames normally.
Do not do any further Post_Frame_Commands. Do the Post_Scene_Command, if any. Exit
POV-Ray with error code 0. On the earlier chart this means skip the rest of step (4) and proceed at step (5).
|
On return from a Post_Frame_Command if there is an action triggered...
| ...and you have specified... | ...then POV-Ray will... |
S or A
|
...skip all remaining frames. Acts as though the scene completed all frames normally. Do not do any further
Post_Frame_Commands. Do the Post_Scene_Command, if any. Exit POV-Ray with error code 0. On the
earlier chart this means skip the rest of step (4) and proceed at step (5).
|
On return from any Post_Scene_Command if there is an action triggered and you have specified S
or A then no special action occurs. This is the same as I for this shell command.
Text output is an important way that POV-Ray keeps you informed about what it is going to do, what it is doing and what it did. The program splits its text messages into 7 separate streams. Some versions of POV-Ray color-codes the various types of text. Some versions allow you to scroll back several pages of messages. All versions allow you to turn some of these text streams off/on or to direct a copy of the text output to one or several files. This section details the options which give you control over text output.
There are seven distinct text streams that POV-Ray uses for output. On some versions each stream is designated by a particular color. Text from these streams are displayed whenever it is appropriate so there is often an intermixing of the text. The distinction is only important if you choose to turn some of the streams off or to direct some of the streams to text files. On some systems you may be able to review the streams separately in their own scroll-back buffer.
Here is a description of each stream.
Banner: This stream displays the program's sign-on banner, copyright, contributor's list, and some help screens. It cannot be turned off or directed to a file because most of this text is displayed before any options or switches are read. Therefore you cannot use an option or switch to control it. There are switches which display the help screens. They are covered in section "Help Screen Switches".
Debug: This stream displays debugging messages. It was primarily designed for developers but this and other streams may also be used by the user to display messages from within their scene files. See section "Text Message Streams" for details on this feature. This stream may be turned off and/or directed to a text file.
Fatal: This stream displays fatal error messages. After displaying this text, POV-Ray will terminate. When the error is a scene parsing error, you may be shown several lines of scene text that leads up to the error. This stream may be turned off and/or directed to a text file.
Render: This stream displays information about what options you have specified to render the scene. It includes feedback on all of the major options such as scene name, resolution, animation settings, anti-aliasing and others. This stream may be turned off and/or directed to a text file.
Statistics: This stream displays statistics after a frame is rendered. It includes information about the number of rays traced, the length of time of the processing and other information. This stream may be turned off and/or directed to a text file.
Status: This stream displays one-line status messages that explain what POV-Ray is doing at the
moment. On some systems this stream is displayed on a status line at the bottom of the screen. This stream cannot be
directed to a file because there is generally no need to. The text displayed by the Verbose option or +V
switch is output to this stream so that part of the status stream may be turned off.
Warning: This stream displays warning messages during the parsing of scene files and other warnings. Despite the warning, POV-Ray can continue to render the scene. You will be informed if POV-Ray has made any assumptions about your scene so that it can proceed. In general any time you see a warning, you should also assume that this means that future versions of POV-Ray will not allow the warned action. Therefore you should attempt to eliminate warning messages so your scene will be able to run in future versions of POV-Ray. This stream may be turned off and/or directed to a text file.
You may suppress the output to the console of the debug, fatal, render, statistic or warning text streams. For
example the Statistic_Console=off option or the -GS switch can turn off the statistic
stream. Using on or +GS you may turn it on again. You may also turn all five of these
streams on or off at once using the All_Console option or +GA switch.
Note: that these options take effect immediately when specified. Obviously any error or warning messages that might occur before the option is read are not be affected.
You may direct a copy of the text streams to a text file for the debug, fatal, render, statistic, or warning text
streams. For example the Statistic_File=s option or the +GSs switch. If
the string s is true or any of the other valid true strings then that stream is
redirected to a file with a default name. Valid true values are true, yes, on
or 1. If the value is false the direction to a text file is turned off. Valid false
values are false, no, off or 0. Any other string specified turns
on file output and the string is interpreted as the output file name.
Similarly you may specify such a true, false or file name string after a switch such as +GSfile.
You may also direct all five streams to the same file using the All_File option or +GA
switch. You may not specify the same file for two or more streams because POV-Ray will fail when it tries to open or
close the same file twice.
Note: that these options take effect immediately when specified. Obviously any error or warning messages that might occur before the option is read will not be affected.
Warning_Level=n
|
Allows you to turn off classes of warnings. |
+WLn
|
Same as Warning_Level=n
|
Level 0 turns off all warnings. Level 5 turns off all language version related warnings. The default is level 10 and it enables all warnings. All other levels are reserved and should not be specified.
-?
|
Show help screen 0 if this is the only switch |
Note: there are no INI style equivalents to these options.
After displaying the help screens, POV-Ray terminates. Because some operating systems do not permit a question mark
as a command line switch you may also use the +H switch.
Note: this switch is also used to specify the height of the image in pixels.
Therefore the +H switch is only interpreted as a help switch if it is the only switch on the command
line.
Graphical interface versions of POV-Ray such as Mac or Windows have extensive online help.
There is more than one way to trace a ray. Sometimes there is a trade-off between quality and speed. Sometimes options designed to make tracing faster can slow things down. This section covers options that tell POV-Ray how to trace rays with the appropriate speed and quality settings.
Quality=n
|
Set quality value to n (0 <= n <= 11) |
+Qn
|
Same as Quality=n
|
The Quality=n option or +Qn switch allows you to specify the image
rendering quality. You may choose to lower the quality for test rendering and raise it for final renders. The quality
adjustments are made by eliminating some of the calculations that are normally performed. For example settings below 4
do not render shadows. Settings below 8 do not use reflection or refraction. The duplicate values allow for future
expansion. The values correspond to the following quality levels:
0, 1
|
Just show quick colors. Use full ambient lighting only. Quick colors are used only at 5 or below. |
2, 3
|
Show specified diffuse and ambient light. |
4
|
Render shadows, but no extended lights. |
5
|
Render shadows, including extended lights. |
6, 7
|
Compute texture patterns, compute photons |
8
|
Compute reflected, refracted, and transmitted rays. |
9, 10, 11
|
Compute media and radiosity |
The default is 9 if not specified.
POV-Ray uses a variety of spatial sub-division systems to speed up ray-object intersection tests. The primary
system uses a hierarchy of nested bounding boxes. This system compartmentalizes all finite objects in a scene into
invisible rectangular boxes that are arranged in a tree-like hierarchy. Before testing the objects within the bounding
boxes the tree is descended and only those objects are tested whose bounds are hit by a ray. This can greatly improve
rendering speed. However for scenes with only a few objects the overhead of using a bounding system is not worth the
effort. The Bounding=off option or -MB switch allows you to force bounding off. The default
value is on.
The Bounding_Threshold=n or +MBn switch allows you to set the minimum
number of objects necessary before bounding is used. The default is +MB25 which means that if your scene
has fewer than 25 objects POV-Ray will automatically turn bounding off because the overhead is not worth it. Generally
it is a good idea to use a much lower threshold like +MB5.
Additionally POV-Ray uses systems known as vista buffers and light buffers to further speed things up. These systems only work when bounding is on and when there are a sufficient number of objects to meet the bounding threshold. The vista buffer is created by projecting the bounding box hierarchy onto the screen and determining the rectangular areas that are covered by each of the elements in the hierarchy. Only those objects whose rectangles enclose a given pixel are tested by the primary viewing ray. The vista buffer can only be used with perspective and orthographic cameras because they rely on a fixed viewpoint and a reasonable projection (i. e. straight lines have to stay straight lines after the projection).
The light buffer is created by enclosing each light source in an imaginary box and projecting the bounding box hierarchy onto each of its six sides. Since this relies on a fixed light source, light buffers will not be used for area lights.
Reflected and transmitted rays do not take advantage of the light and vista buffer.
The default settings are Vista_Buffer=on or +UV and Light_Buffer=on or +UL.
The option to turn these features off is available to demonstrate their usefulness and as protection against
unforeseen bugs which might exist in any of these bounding systems.
In general, any finite object and many types of CSG of finite objects will properly respond to this bounding system. In addition blobs and meshes use an additional internal bounding system. These systems are not affected by the above switch. They can be switched off using the appropriate syntax in the scene file (see "Blob" and "Mesh" for details).
Text objects are split into individual letters that are bounded using the bounding box hierarchy. Some CSG combinations of finite and infinite objects are also automatically bound. The end result is that you will rarely need to add manual bounding objects as was necessary in earlier versions of POV-Ray unless you use many infinite objects.
Early versions of POV-Ray had no system of automatic bounding or spatial sub-division to speed up ray-object
intersection tests. Users had to manually create bounding boxes to speed up the rendering. Since version 3.0, POV-Ray
has had more sophisticated automatic bounding than any previous version. In many cases the manual bounding on older
scenes is slower than the new automatic systems. Therefore POV-Ray removes manual bounding when it knows it will help.
In rare instances you may want to keep manual bounding. Some older scenes incorrectly used bounding when they should
have used clipping. If POV-Ray removes the bounds in these scenes the image will not look right. To turn off the
automatic removal of manual bounds you should specify Remove_Bounds=off or use -UR. The
default is Remove_Bounds=on.
One area where the jury is still out is the splitting of manually bounded unions. Unbounded unions are always split
into their component parts so that automatic bounding works better. Most users do not bound unions because they know
that doing so is usually slower. If you do manually bound a union we presume you really want it bound. For safety sake
we do not presume to remove such bounds. If you want to remove manual bounds from unions you should specify Split_Unions=on
or use +SU. The default is Split_Unions=off.
The ray-tracing process is in effect a discrete, digital sampling of the image with typically one sample per pixel. Such sampling can introduce a variety of errors. This includes a jagged, stair-step appearance in sloping or curved lines, a broken look for thin lines, moiré patterns of interference and lost detail or missing objects, which are so small they reside between adjacent pixels. The effect that is responsible for those errors is called aliasing.
Anti-aliasing is any technique used to help eliminate such errors or to reduce the negative impact they have on the
image. In general, anti-aliasing makes the ray-traced image look smoother. The Antialias=on
option or +A switch turns on POV-Ray's anti-aliasing system.
When anti-aliasing is turned on, POV-Ray attempts to reduce the errors by shooting more than one viewing ray into each pixel and averaging the results to determine the pixel's apparent color. This technique is called super-sampling and can improve the appearance of the final image but it drastically increases the time required to render a scene since many more calculations have to be done.
POV-Ray gives you the option to use one of two alternate super-sampling methods. The Sampling_Method=n
option or +AMn switch selects either type 1 or type 2. Selecting one
of those methods does not turn anti-aliasing on. This has to be done by using the +A command line switch
or Antialias=on option.
Type 1 is an adaptive, non-recursive, super-sampling method. It is adaptive because not every pixel is super-sampled. Type 2 is an adaptive and recursive super-sampling method. It is recursive because the pixel is sub-divided and sub-sub-divided recursively. The adaptive nature of type 2 is the variable depth of recursion.
In the default, non-recursive method (+AM1), POV-Ray initially traces one ray per pixel. If the color
of a pixel differs from its neighbors (to the left or above) by at least the set threshold value then the pixel is
super-sampled by shooting a given, fixed number of additional rays. The default threshold is 0.3 but it may be changed
using the Antialias_Threshold=n.n option. When the switches are used, the threshold may
optionally follow the +A. For example +A0.1 turns anti-aliasing on and sets the threshold
to 0.1.
The threshold comparison is computed as follows. If r1, g1, b1 and r2, g2, b2 are the rgb components of two pixels then the difference between pixels is computed by
diff = abs(r1-r2) + abs(g1-g2) + abs(b1-b2)
If this difference is greater than the threshold then both pixels are super-sampled. The rgb values are in the range from 0.0 to 1.0 thus the most two pixels can differ is 3.0. If the anti-aliasing threshold is 0.0 then every pixel is super-sampled. If the threshold is 3.0 then no anti-aliasing is done. Lower threshold means more anti-aliasing and less speed. Use anti-aliasing for your final version of a picture, not the rough draft. The lower the contrast, the lower the threshold should be. Higher contrast pictures can get away with higher tolerance values. Good values seem to be around 0.2 to 0.4.
When using the non-recursive method, the default number of super-samples is nine per pixel, located on a 3*3 grid.
The Antialias_Depth=n option or +Rn switch controls the number of rows
and columns of samples taken for a super-sampled pixel. For example +R4 would give 4*4=16 samples per
pixel.
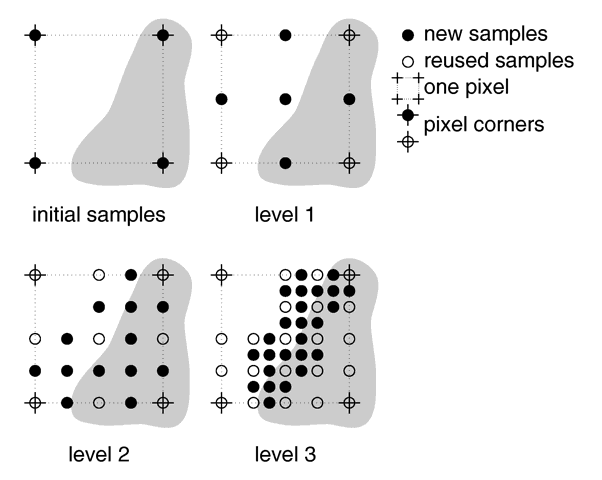
The second, adaptive, recursive super-sampling method starts by tracing four rays at the corners of each pixel. If
the resulting colors differ more than the threshold amount additional samples will be taken. This is done recursively,
i.e. the pixel is divided into four sub-pixels that are separately traced and tested for further subdivision. The
advantage of this method is the reduced number of rays that have to be traced. Samples that are common among adjacent
pixels and sub-pixels are stored and reused to avoid re-tracing of rays. The recursive character of this method makes
the super-sampling concentrate on those parts of the pixel that are more likely to need super-sampling (see figure
below).
The maximum number of subdivisions is specified by the Antialias_Depth=n option or +Rn
switch. This is different from the adaptive, non-recursive method where the total number of super-samples is
specified. A maximum number of n subdivisions results in a maximum number of samples per pixel that is given
by the following table.
+Rn
|
Number of additional samples per super-sampled pixel for the non-recursive method +AM1
|
Maximum number of samples per super-sampled pixel for the recursive method +AM2
|
1
|
1 | 9 |
2
|
4 | 25 |
3
|
9 | 81 |
4
|
16 | 289 |
5
|
25 | 1089 |
6
|
36 | 4225 |
7
|
49 | 16641 |
8
|
64 | 66049 |
9
|
81 | 263169 |
Note: the maximum number of samples in the recursive case is hardly ever reached for a given pixel. If the recursive method is used with no anti-aliasing each pixel will be the average of the rays traced at its corners. In most cases a recursion level of three is sufficient.
Another way to reduce aliasing artefacts is to introduce noise into the sampling process. This is called jittering
and works because the human visual system is much more forgiving to noise than it is to regular patterns. The location
of the super-samples is jittered or wiggled a tiny amount when anti-aliasing is used. Jittering is used by default but
it may be turned off with the Jitter=off option or -J switch. The amount of jittering can be
set with the Jitter_Amount=n.n option. When using switches the jitter scale may be specified
after the +Jn.n switch. For example +J0.5 uses half the normal jitter. The default
amount of 1.0 is the maximum jitter which will insure that all super-samples remain inside the original pixel.
Note: the jittering noise is random and non-repeatable so you should avoid using jitter in animation sequences as the anti-aliased pixels will vary and flicker annoyingly from frame to frame.
If anti-aliasing is not used one sample per pixel is taken regardless of the super-sampling method specified.
|
|
3.1.1 Notation and Basic Assumptions | 3.1.2 Command-line Options | 3.2 Scene Description Language |
|